"I just jailbreak my iPhone 6S to iOS 9.0.2, but I had been lost some important voicememos which record and store something I want to remember, so my question is, can I retrieve my disappeared voice memos from iPhone 6S? Or how can I get all my lost iPhone 6S voice memos back after jailbreak?" In this circumstance, an iPhone Data Recovery- Wondershare Dr.Fone for iOS is a a must-have recovery tool that allows you to retrieve your missing voice memos with or without backup. The program offers you 3 recovery mode to get back your lost bookmarks: "Recover voice memos from iTunes Backup Files", “Recover voice memos from iCloud Backup File” and "Recover voice memos from iOS Devices". For more awesome features, please click the icon below and freely download this software.Download iPhone Data Recovery Software:
 Three Methods to Get Back Your Lost iPhone voice memos after jailbreakTutorials 1: Recover voice memos from iPhone 6S DirectlyStep 1. Please connect your iPhone 6S to computer and launch the program. Then you need to scan your iPhone 6S by click the "Start Scan" button after connecting you iPhone 6S to the computer.
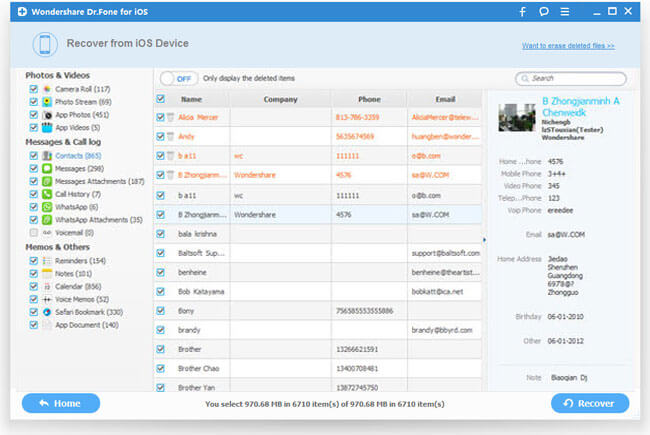
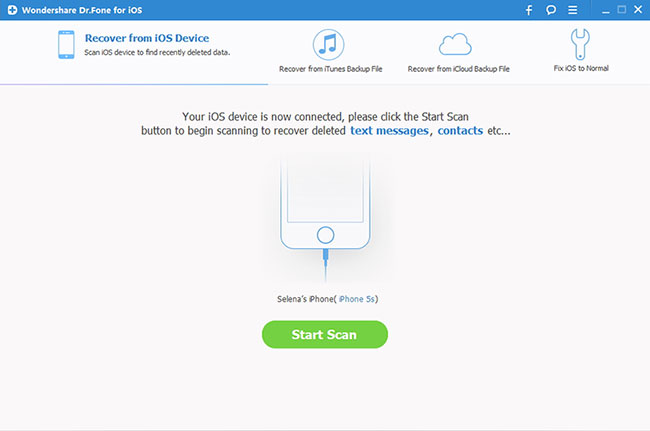 Step 2. Preview and restore iPhone 6S voice memosWhen you finish scanning, all found data will be listed in order. Preview the detailed content by select "Voice Memos". Mark what you need and click "Recover" button to save them on your computer.
 Tutorials 2: Recover iPhone 6S voice memos from iTunes BackupStep 1: Choose iTunes Backup Record to Scan
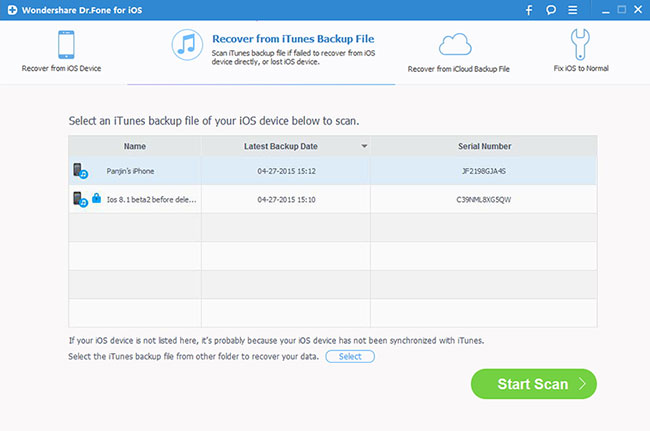 Step 2: Preview the scanning resultStep 3: Select the Target Files and Start to Recover to your deviceTutorials 3: Recover iPhone voice memos from iCloud BackupStep 1: Choose the recovery mode and Sign in your iCloud
 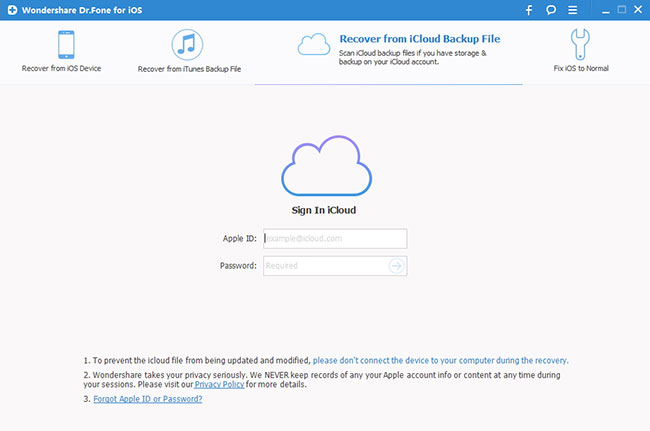 Step 2: Download and scan your iCloud backup
 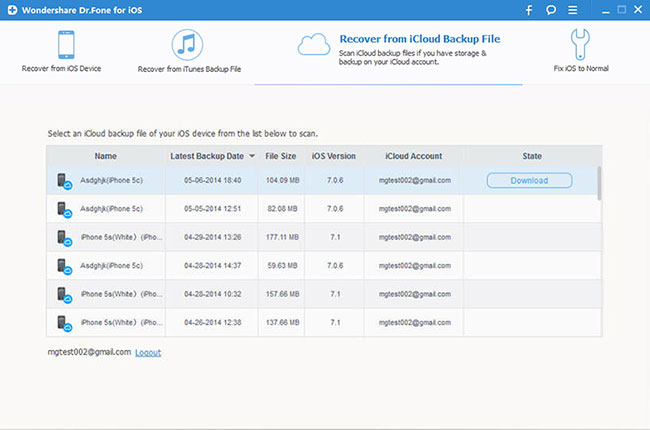 Step 3: Preview and recover whatever you want from the iCloud backupBuy iPhone Data Recovery Software for Win/Mac now:
 Related Software:Wondershare TunesGo: Frees your music anywhere from iPhone 6S, doing what iTunes can’t.Wondershare Dr.Fone for Android: A quick way to recover your lost or deleted data from Android.Wondershare MobileTrans: One-click phone transfer tool to let you transfer data between Android, iOS, and Symbian devices. iFastime Video Converter Ultimate: Make all your Blu-ray, DVD collections and movie library compatible with iPhone 6S.Have more questions about how to retrieve lost voice memos On iPhone 6S After jailbreak, please feel free to contact us>>or leave a message at Facebook.More Topics:
Source: http://bestdatarecovertips.altervista.org/recover-iphone-6s-voicememos-after-jailbreak/
Related Software:Wondershare TunesGo: Frees your music anywhere from iPhone 6S, doing what iTunes can’t.Wondershare Dr.Fone for Android: A quick way to recover your lost or deleted data from Android.Wondershare MobileTrans: One-click phone transfer tool to let you transfer data between Android, iOS, and Symbian devices. iFastime Video Converter Ultimate: Make all your Blu-ray, DVD collections and movie library compatible with iPhone 6S.Have more questions about how to retrieve lost voice memos On iPhone 6S After jailbreak, please feel free to contact us>>or leave a message at Facebook.More Topics:
Source: http://bestdatarecovertips.altervista.org/recover-iphone-6s-voicememos-after-jailbreak/
MMS is short for Multimedia Messaging Service, you can send messages that include videos, music, photos and other multimedia contents between two phones, no matter your use iPhone, Android phone or Noikia mobile phone, you can send MMS between phone to phone, which makes text messages lively and exciting. MMS is sometimes important for us. What if we lost MMS on iPhone 5C after upgrading to iOS 9, jailbreak or wrong deletion? Can we recover iPhone 5C MMS? I will summarize 3 most popular ways to recover lost or deleted MMS from iPhone 5C in the following paragraphs.
 All you need is to use professional iPhone Data Recovery Software- Wondershare Dr.Fone for iOS. It is very helpful tool to recover MMS and other data like MMS, text messages, iMessages, contacts, photos, call history, notes etc. from iPhone 5C. This is the best recovery software from iPhone users as it enables to recover the lost data from iPhone 5C directly or extract iPhone files through iCloud backup or iTunes backup files. For Mac users, turn to the mac version.
Download iPhone Data Recovery Software:
Way 1: Have no Backup? Retrieve MMS Directly from Your iPhone 5C
To avoid losing your iPhone MMS, having an iPhone backup is very important and useful. But if you forget to backup MMS, iPhone MMS recovery tool still enables you to get them back.
Connect your iPhone 5C to computer and run iPhone Data Recovery
Click on "Start Scan" to scan your iPhone data.
After scanning, you are allowed to preview and find the MMS you need to recover. Select the one you need and click "Recover".
All you need is to use professional iPhone Data Recovery Software- Wondershare Dr.Fone for iOS. It is very helpful tool to recover MMS and other data like MMS, text messages, iMessages, contacts, photos, call history, notes etc. from iPhone 5C. This is the best recovery software from iPhone users as it enables to recover the lost data from iPhone 5C directly or extract iPhone files through iCloud backup or iTunes backup files. For Mac users, turn to the mac version.
Download iPhone Data Recovery Software:
Way 1: Have no Backup? Retrieve MMS Directly from Your iPhone 5C
To avoid losing your iPhone MMS, having an iPhone backup is very important and useful. But if you forget to backup MMS, iPhone MMS recovery tool still enables you to get them back.
Connect your iPhone 5C to computer and run iPhone Data Recovery
Click on "Start Scan" to scan your iPhone data.
After scanning, you are allowed to preview and find the MMS you need to recover. Select the one you need and click "Recover".
 Way 2: Have an iTunes Backup? Restore iPhone 5C MMS from iTunes
iTunes can automatically backup the data on an iPhone 5C, when you sync with it. After losing data, you can directly restore the backup to your iPhone 5C.
Select "Recover Data from iTunes backup file", and extract iTunes backup file by tap "Start scan". (You may need to delete old iTunes backup if there are too many.)
Way 3: Have an iCloud Backup? Recover iPhone 5C MMS from iCloud Backup
You can also retrieve MMS from your iCloud backup file if you have one.
Login into your iCloud account.
Select and download iCloud backup.
Preview and recover your lost MMS from iPhone 5C.
Please note that no privacy will be leaking out when you log into your iCloud account on iPhone Data Recovery.
Losing text messages on iPhone? Refer to another post to restore iPhone text messages.
Additional Tip: Here are detailed steps for sending MMS photos from iPhone.
1. Tap the "Photos" icon to see your photos. Tap a photo album, and then tap a thumbnail of a photo to display it on the iPhone's screen.
2. Tap the icon of a box with the arrow pointing right, located on the bottom of the screen. If you don't see the icon, tap the middle of the photo to bring it up.
3. Tap "MMS."
4. Tap the pen icon, and then type the phone number or name of the recipient.
5. Tap the text input field above the keyboard. Type a message. Tap "Send" and then iPhone will send the MMS photo.
6. For the MMS you received, you can tap the photo once, then Click upper right corner and hit save image. It will go into camera roll where where are MMS images stored iphone.
Buy iPhone Data Recovery Software for Win/Mac now:
Have more questions about how to get lost iPhone 5C MMS Back, please feel free to contact us>> or leave a message at Facebook.
Way 2: Have an iTunes Backup? Restore iPhone 5C MMS from iTunes
iTunes can automatically backup the data on an iPhone 5C, when you sync with it. After losing data, you can directly restore the backup to your iPhone 5C.
Select "Recover Data from iTunes backup file", and extract iTunes backup file by tap "Start scan". (You may need to delete old iTunes backup if there are too many.)
Way 3: Have an iCloud Backup? Recover iPhone 5C MMS from iCloud Backup
You can also retrieve MMS from your iCloud backup file if you have one.
Login into your iCloud account.
Select and download iCloud backup.
Preview and recover your lost MMS from iPhone 5C.
Please note that no privacy will be leaking out when you log into your iCloud account on iPhone Data Recovery.
Losing text messages on iPhone? Refer to another post to restore iPhone text messages.
Additional Tip: Here are detailed steps for sending MMS photos from iPhone.
1. Tap the "Photos" icon to see your photos. Tap a photo album, and then tap a thumbnail of a photo to display it on the iPhone's screen.
2. Tap the icon of a box with the arrow pointing right, located on the bottom of the screen. If you don't see the icon, tap the middle of the photo to bring it up.
3. Tap "MMS."
4. Tap the pen icon, and then type the phone number or name of the recipient.
5. Tap the text input field above the keyboard. Type a message. Tap "Send" and then iPhone will send the MMS photo.
6. For the MMS you received, you can tap the photo once, then Click upper right corner and hit save image. It will go into camera roll where where are MMS images stored iphone.
Buy iPhone Data Recovery Software for Win/Mac now:
Have more questions about how to get lost iPhone 5C MMS Back, please feel free to contact us>> or leave a message at Facebook.
More Topics:
Source: http://i-ios-9-data-recover.blogspot.com/2015/12/get-iphone-5c-mms-back.html
Apple has already been updating the apps and other services to meet with iOS 9, so users may enjoy more convenience after they update to iOS 9. iOS 9 comes with a ton of new features and improvements, but like any other major iOS software update, it comes with its own set of problems. Here's a list of top 15 common iOS 9 problems, and tips on how to fix them. 1. Data Loss during/after iOS 9.2/9.1/9 UpgradeiOS system upgrade, often will bring certain negative influence to the user, the most direct performance is the loss of iPhone/iPad/iPod data. Learn the lesson of iOS 8 upgrade, many users know to back up their iOS data before upgrading to iOS 9, while a simple backup is not enough, you need a more comprehensive defense or preparation. To recover lost data on iPhone/iPad/iPod after iOS 9.2/9.1/9 Upgrade, Wondershare Dr.Fone for iOS (Mac) is the all-round and professional iOS data recovery software that providing the most perfect solutions to recover your lost or deleted data like contacts, messages, call history, notes, WhatsApp data, reminders, Safari bookmarks, Calendar, photos, videos, and more from iPhone/iPad/iPod after updating to iOS 9. For windows users, here is the windows version. The recovery program allows you to restore your data from iOS devices with 3 simple yet reliable methods: Download Mac iOS Data Recovery Software: Three Simple Ways to Recover Lost iOS Data after Updating to iOS 9Methods 1. Direct Restore Lost Data from iPhone/iPad/iPodStep 1. Connect your iPhone/iPad/iPod to the computerInstall and launch the iOS Data Recovery on your PC, and connect your idevice via an USB cable. Then you'll see the primary window as the below picture.
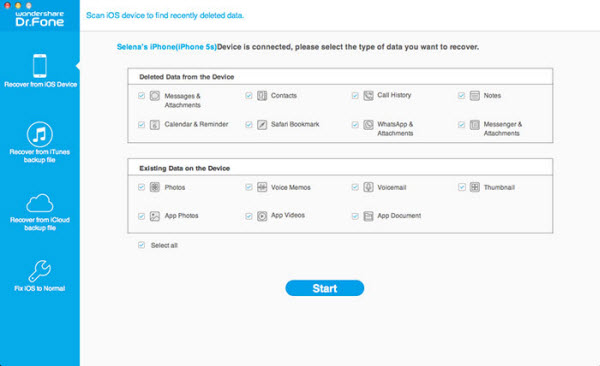 Step 2. Scan the lost data on your iPhone/iPad/iPodClick on the "Start Scan" button, and the program will automatically scan the existing or the lost data on your iPhone/iPad/iPod immediately.Step 3. Preview and recover lost data from your iPhone/iPad/iPodAfter a few seconds, all data in your iOS devices will be displayed in categories, including your lost data and the existing data on your iPhone/iPad/iPod. You are allowed to press the menu on the left side of window to preview the content you want one by one, such as contacts, messages, and so on. After that, click on "Recover" button to begin restoring all the selected data back to your computer.Methods 2. Extract to Recover from iTunes Backup FilesStep 1. Choose your iTunes backup and scan to extract itWhen running the program, click "Recover from iTunes Backup File" on the primary interface to brings up the iTunes backup recovery window, here, you can see all the iTunes backup files of your iPhone or other iDevices which was created on this computer, choose one you want and click "Start Scan" to extract it.
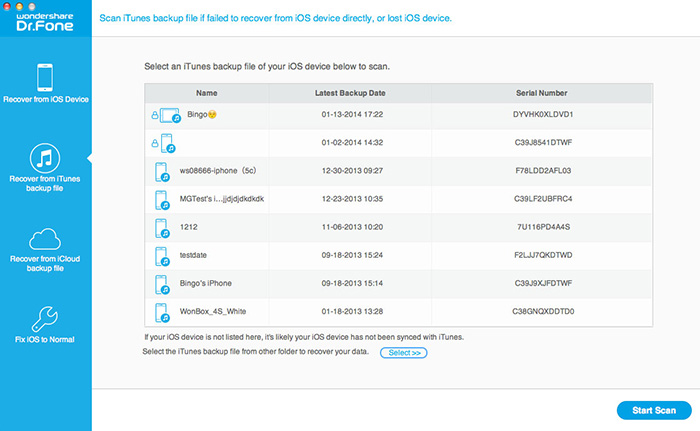 Step 2. Preview and restore previous data as you likeThe scan will take you some time. Once it's complete, you can see all data in the backup file will be extracted and displayed in categories. Check and preview them one by one, mark whose what you want and click "Recover" to save them back to your computer with a click.Methods 3. Extract to Recover from iCloud Backup FilesStep 1. Choose the iCloud backup recovery mode and log in your accountChoose the recovery mode of "Recover from iCloud Backup Files", and sign in your iCloud on the pop-up interface.
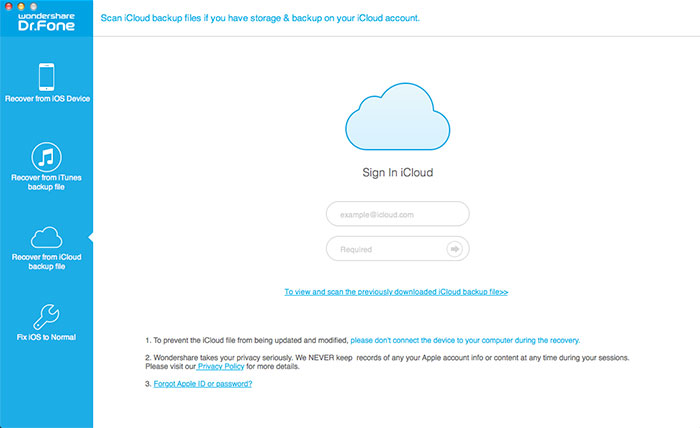 Step 2. Download and scan your iCloud backupOnce you signed into iCloud, the iOS Data Recovery will automatically find and show all the iCloud backup files to you, choose the one you want and download it. If done, click on "Scan" to scan and extract the data from it.
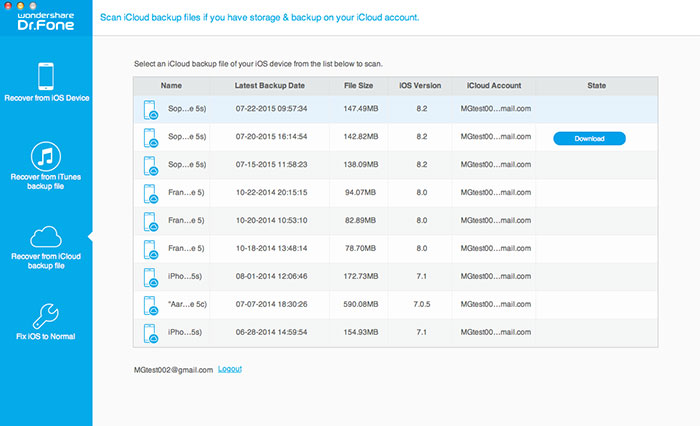 Step 3. Preview and recover the data selectivelyThe scanning program will be finish in a few minutes. Once it complete, you can preview almost all data in your iCloud backup file, like contacts, SMS, call history, and so on. Preview to mark them one by one as you like. If everything is OK, click on the "Recover" to get them back to your computer with one click.2. Getting Stuck at "Slide to Upgrade" screenA number of users have reported that their device is getting stuck at the "Slide to Upgrade" screen. The only way to resolve this issue is by putting your device in recovery mode, and restoring it from backup. But before you do that don't forget to take a backup of your device using iTunes.Check our post for more details to fix iOS 9 update getting stuck at "Slide to Upgrade" screen.3. Touchscreen not working or UnresponsiveI've observed that at times an app stops responding. It just stops responding to touch input. In this case, double press the Home button, and swipe up on the card for the app to kill it, and relaunch the app again. I have also heard that in some cases iPhone or iPad's screen stops responding on the Home screen, you don't need to panic. In most cases force restarting your iPhone or iPad will resolve the issue. To force restart your device, press and hold the Power (Sleep/Wake) button and the Home button simultaneously till you see the Apple logo.4. App Crashing issueIf one of your favorite app or apps are crashing after upgrading to iOS 9, then it could be due to compatibility issues with the latest iOS software update. Check the App Store to see if the developer has released an update to support iOS 9. You can also try to delete the app and reinstall it again to see if it helps. Before you delete the app, make sure the data has been linked to iCloud or any other cloud services, so you can restore it after reinstalling.5. iOS 9 is slowA number of people are reporting that their devices are more sluggish after upgrading to iOS 9. Some users feel that iOS 9 is slower than iOS 8. If you've just upgraded to iOS 9, then you should ideally give it a few hours or a day for indexing and to complete other background activities.6. iOS 9 Battery life problemsBased on the poll we took few days back, it looks like a high percentage of users seem to be having battery life problems after upgrading to iOS 9.The problem with battery life issues is that it is very subjective as it is based on your usage pattern, so it is difficult to pinpoint what exactly is causing a problem.7. iOS 9 Wi-Fi ProblemsAnother common problem people are facing after updating their iPhone or iPad to iOS 9 is Wi-Fi connectivity problems.The issues being reported include not being able to connect to a Wi-Fi network, getting incorrect password prompt despite entering the correct password, Wi-Fi settings grayed out, dropping connection intermittently or speeds being extremely slow. Most networking related issues I've experienced have been fixed after resetting network settings. Resetting these settings flushes caches and clears DHCP settings and other networking related info. To reset network settings, open the Settings app and navigate to Settings > General > Reset and tap on Reset Network Settings.8. iDevices are OverheatSome users reported that their devices are getting hot after iOS 9 update, this might relate to the battery overworking. Try to close all apps you don't need, turn off your wifi or mobile data, and get a new cooling case -available for iPhone 5/5s or iPhone 6.9. Speaker malfunctionA weird bug reported by some users that when the phone is paired with a Bluetooth device, the speaker drop any sound. If you face it, then you should turn off your Bluetooth.10. iOS Devices Keeps Freezing during/after UpgradeTo help to get rid of this issue, you can try the following tricks.Try a Hard RebootTo do a hard reboot, simply hold down the Home button and Power button simultaneously until you see the Apple logo. Keep holding those two buttons down for at least 30 seconds. If nothing happens, move on to the next step.Plug into a wall outletSometimes plugging into a wall outlet like you were going to charge your iPhone or iPad can trigger it to boot up. Try plugging your device in and leaving it that way. If, after about 15 minutes, your iPhone or iPad is still not responding, move on to the next step.Reset all settingsIf your iPhone, iPad, iPod freeze after iOS 9 upgrade, and the previous solutions didn't help, you should reset all settings.Navigate to Settings>> Tap on General >> Tap on Reset >> Choose Reset all Settings.Read the full solutions here.11. Stuck on Apple Logo during iOS 9.2/9.1/9 UpdateThis is a common and annoying problem that when we try to update to the new OS, the iDevices is more likely to be stuck on Apple logo and can't boot up completely. If your iPhone or iPad stays on Apple logo screen during iOS 9 update, you can try the force reboot your iPhone or put it in recovery mode.Hold and Press Home & Power button for 10 seconds to reboot your iPhone. If it still stuck on Apple logo, you will need to put it in recovery mode.Plug the iPhone to your computer via the USB cable and make sure that the latest iTunes is installed.Press and hold Home & Power button for 10 seconds. Then release the power button but keep pressing the home button.You will see the Connect to iTunes screen and you can let go of the Home button.Now you can restore your iPhone with iTunes.Learn How to Fix An iPhone Stuck on Apple Logo12. Stuck in Recovery Mode/iTunes Logo after upgradeUsers complain that the iPhone is stuck in recovery mode as they found the iTunes logo on the screen. Now, follow the steps to get out of iTunes logo if you stuck in Recovery Mode after upgrading to the newest iOS 9. Before start, make sure you have installed the latest version of iTunes: Hold both the home screen and the sleep/wake button for 10 seconds and the device will turn off. Now, turn it on again and you may find that your phone will start normally.See how to exit iPhone Recovery Mode after Updating to iOS 9 13. iOS 9.2/9.1/9 Update FailedThere are 2 simple tricks if you're running into this problem updating to iOS 9.The first is try, try and then try again.Apple's servers are currently under a lot of pressure, rolling out today's operating system change to millions of iPhones and iPads worldwide. That's a lot of required bandwidth.The second solution is to go old-school by manually downloading the software to your phone or tablet. This requires a USB lightning cable, a computer and iTunes. Yes, you have to boot up Apple's old music software, the one that isn't Apple Music.13. Compatibility Issues with AppsAfter update ios 8 to iOS 9, many users are crying that they are shocked and disappointed that part of the apps which work well on iOS 8 are simply not compatible in iOS 9. So the only quick fix to this problem is to downgrade to iOS 8 from iOS 9.14. Downloading iOS 9.2/9.1/9 to iPhone iPad, Much More Space Needed!Though Apple officially said that the iOS 9 downloading just occupies your 1.3 GB space in size, it's definitely a thunderclap for certain iPhone iPad users whose iPhone iPad space range from 8GB-16GB, especially for those who doesn't sync to iTunes to store their daily files.Don't worry, iOS 9 allows you to temporarily delete apps in a bid to successfully download iOS 9. And after iOS 8 to iOS 9 upgrade is over, all deleted apps will be automatically replaced. And if you don't wanna try this method, you can also free up iPhone iPad space, which is also a good way to guarantee you smooth fix iOS 9 space problem.15. iOS 9 update iPad problems There are complaints on forum that report they have suffer from iOS 9 update problems on iPad like the movie box not working on ipad, they can't get split view on iPad, no low power mode on iPad after updating to iOS 9 etc. Some of those iOS 9 problems also happens on iPhone. What has been your experience? Are you facing any other problem after upgrade to iOS 9? Let us know in the comments.Buy iOS Data Recovery Software for Mac/Win now: Related Software:Wondershare TunesGo (Mac): Frees your music anywhere from iOS devices, doing what iTunes can’t.Wondershare Dr.Fone for Android (Mac): A quick way to recover your lost or deleted data from Android .Wondershare MobileTrans for Mac: One-click phone transfer tool to let you transfer data between Android, iOS, and Symbian devices. iFastime Video Converter Ultimate for Mac: Make all your Blu-ray, DVD collections and movie library compatible with iPhone/iPad/iPod.Have more questions about top 15 iOS 9 Upgrade Problems and Solutions, please feel free to contact us>> or leave a message at Facebook.More Topics:
Source: http://i-ios-9-data-recover.blogspot.com/2015/11/ios-9-update-problems-and-solutions.html
Step 3. Preview and recover the data selectivelyThe scanning program will be finish in a few minutes. Once it complete, you can preview almost all data in your iCloud backup file, like contacts, SMS, call history, and so on. Preview to mark them one by one as you like. If everything is OK, click on the "Recover" to get them back to your computer with one click.2. Getting Stuck at "Slide to Upgrade" screenA number of users have reported that their device is getting stuck at the "Slide to Upgrade" screen. The only way to resolve this issue is by putting your device in recovery mode, and restoring it from backup. But before you do that don't forget to take a backup of your device using iTunes.Check our post for more details to fix iOS 9 update getting stuck at "Slide to Upgrade" screen.3. Touchscreen not working or UnresponsiveI've observed that at times an app stops responding. It just stops responding to touch input. In this case, double press the Home button, and swipe up on the card for the app to kill it, and relaunch the app again. I have also heard that in some cases iPhone or iPad's screen stops responding on the Home screen, you don't need to panic. In most cases force restarting your iPhone or iPad will resolve the issue. To force restart your device, press and hold the Power (Sleep/Wake) button and the Home button simultaneously till you see the Apple logo.4. App Crashing issueIf one of your favorite app or apps are crashing after upgrading to iOS 9, then it could be due to compatibility issues with the latest iOS software update. Check the App Store to see if the developer has released an update to support iOS 9. You can also try to delete the app and reinstall it again to see if it helps. Before you delete the app, make sure the data has been linked to iCloud or any other cloud services, so you can restore it after reinstalling.5. iOS 9 is slowA number of people are reporting that their devices are more sluggish after upgrading to iOS 9. Some users feel that iOS 9 is slower than iOS 8. If you've just upgraded to iOS 9, then you should ideally give it a few hours or a day for indexing and to complete other background activities.6. iOS 9 Battery life problemsBased on the poll we took few days back, it looks like a high percentage of users seem to be having battery life problems after upgrading to iOS 9.The problem with battery life issues is that it is very subjective as it is based on your usage pattern, so it is difficult to pinpoint what exactly is causing a problem.7. iOS 9 Wi-Fi ProblemsAnother common problem people are facing after updating their iPhone or iPad to iOS 9 is Wi-Fi connectivity problems.The issues being reported include not being able to connect to a Wi-Fi network, getting incorrect password prompt despite entering the correct password, Wi-Fi settings grayed out, dropping connection intermittently or speeds being extremely slow. Most networking related issues I've experienced have been fixed after resetting network settings. Resetting these settings flushes caches and clears DHCP settings and other networking related info. To reset network settings, open the Settings app and navigate to Settings > General > Reset and tap on Reset Network Settings.8. iDevices are OverheatSome users reported that their devices are getting hot after iOS 9 update, this might relate to the battery overworking. Try to close all apps you don't need, turn off your wifi or mobile data, and get a new cooling case -available for iPhone 5/5s or iPhone 6.9. Speaker malfunctionA weird bug reported by some users that when the phone is paired with a Bluetooth device, the speaker drop any sound. If you face it, then you should turn off your Bluetooth.10. iOS Devices Keeps Freezing during/after UpgradeTo help to get rid of this issue, you can try the following tricks.Try a Hard RebootTo do a hard reboot, simply hold down the Home button and Power button simultaneously until you see the Apple logo. Keep holding those two buttons down for at least 30 seconds. If nothing happens, move on to the next step.Plug into a wall outletSometimes plugging into a wall outlet like you were going to charge your iPhone or iPad can trigger it to boot up. Try plugging your device in and leaving it that way. If, after about 15 minutes, your iPhone or iPad is still not responding, move on to the next step.Reset all settingsIf your iPhone, iPad, iPod freeze after iOS 9 upgrade, and the previous solutions didn't help, you should reset all settings.Navigate to Settings>> Tap on General >> Tap on Reset >> Choose Reset all Settings.Read the full solutions here.11. Stuck on Apple Logo during iOS 9.2/9.1/9 UpdateThis is a common and annoying problem that when we try to update to the new OS, the iDevices is more likely to be stuck on Apple logo and can't boot up completely. If your iPhone or iPad stays on Apple logo screen during iOS 9 update, you can try the force reboot your iPhone or put it in recovery mode.Hold and Press Home & Power button for 10 seconds to reboot your iPhone. If it still stuck on Apple logo, you will need to put it in recovery mode.Plug the iPhone to your computer via the USB cable and make sure that the latest iTunes is installed.Press and hold Home & Power button for 10 seconds. Then release the power button but keep pressing the home button.You will see the Connect to iTunes screen and you can let go of the Home button.Now you can restore your iPhone with iTunes.Learn How to Fix An iPhone Stuck on Apple Logo12. Stuck in Recovery Mode/iTunes Logo after upgradeUsers complain that the iPhone is stuck in recovery mode as they found the iTunes logo on the screen. Now, follow the steps to get out of iTunes logo if you stuck in Recovery Mode after upgrading to the newest iOS 9. Before start, make sure you have installed the latest version of iTunes: Hold both the home screen and the sleep/wake button for 10 seconds and the device will turn off. Now, turn it on again and you may find that your phone will start normally.See how to exit iPhone Recovery Mode after Updating to iOS 9 13. iOS 9.2/9.1/9 Update FailedThere are 2 simple tricks if you're running into this problem updating to iOS 9.The first is try, try and then try again.Apple's servers are currently under a lot of pressure, rolling out today's operating system change to millions of iPhones and iPads worldwide. That's a lot of required bandwidth.The second solution is to go old-school by manually downloading the software to your phone or tablet. This requires a USB lightning cable, a computer and iTunes. Yes, you have to boot up Apple's old music software, the one that isn't Apple Music.13. Compatibility Issues with AppsAfter update ios 8 to iOS 9, many users are crying that they are shocked and disappointed that part of the apps which work well on iOS 8 are simply not compatible in iOS 9. So the only quick fix to this problem is to downgrade to iOS 8 from iOS 9.14. Downloading iOS 9.2/9.1/9 to iPhone iPad, Much More Space Needed!Though Apple officially said that the iOS 9 downloading just occupies your 1.3 GB space in size, it's definitely a thunderclap for certain iPhone iPad users whose iPhone iPad space range from 8GB-16GB, especially for those who doesn't sync to iTunes to store their daily files.Don't worry, iOS 9 allows you to temporarily delete apps in a bid to successfully download iOS 9. And after iOS 8 to iOS 9 upgrade is over, all deleted apps will be automatically replaced. And if you don't wanna try this method, you can also free up iPhone iPad space, which is also a good way to guarantee you smooth fix iOS 9 space problem.15. iOS 9 update iPad problems There are complaints on forum that report they have suffer from iOS 9 update problems on iPad like the movie box not working on ipad, they can't get split view on iPad, no low power mode on iPad after updating to iOS 9 etc. Some of those iOS 9 problems also happens on iPhone. What has been your experience? Are you facing any other problem after upgrade to iOS 9? Let us know in the comments.Buy iOS Data Recovery Software for Mac/Win now: Related Software:Wondershare TunesGo (Mac): Frees your music anywhere from iOS devices, doing what iTunes can’t.Wondershare Dr.Fone for Android (Mac): A quick way to recover your lost or deleted data from Android .Wondershare MobileTrans for Mac: One-click phone transfer tool to let you transfer data between Android, iOS, and Symbian devices. iFastime Video Converter Ultimate for Mac: Make all your Blu-ray, DVD collections and movie library compatible with iPhone/iPad/iPod.Have more questions about top 15 iOS 9 Upgrade Problems and Solutions, please feel free to contact us>> or leave a message at Facebook.More Topics:
Source: http://i-ios-9-data-recover.blogspot.com/2015/11/ios-9-update-problems-and-solutions.html
After downloading and installing iOS 9, many iPhone, iPad and iPod touch users have come up with complaints of lag and slow performance of their devices. (See iOS 9 vs. iOS 8) If you are also experiencing this problem, read this how-to and fix your problem. For some users, this was such a poor experience that they wanted to downgrade from iOS 9 to iOS 8.4.1. But if you want to stick to iOS 9, then you need to fix this issue by following 6 simple methods. How to Fix iOS 9 Lagging and Slow Performance on iPhone, iPad and iPod1. Reduce MotionEvery new version of iOS comes equipped with a bunch of settings and configurable options that get buried away within the system. Some of these settings are extremely important, whereas others, such as the Reduce Motion integration, are user-specific and depend entirely on your own preference. By default, Reduce Motion is set to OFF, which means that the user interface is dynamic and animated throughout, this includes a gorgeous, subtle parallax effect on icons. Of course, this level of dynamic and animated behavior comes with a performance trade off for certain hardware.To prevent the system from adding this level of effect to icons and other areas of the user interface you can enable Reduce Motion by heading to Settings > General > Accessibility > Reduce Motion, and toggling the switch to ON.
 2. Reduce TransparencySome of Apple's older devices may struggle to render the visual effects that iOS 9 wants to apply throughout. It's all well and good having these subtle, eye-catching features throughout the system, but when they significantly hinder the performance and experience received then it can become extremely frustrating. Thankfully, features such as transparency, which improves contrast on some backgrounds to increase legibility, can be enabled or disabled at will.You can reduce the transparency of backgrounds within iOS 9 by heading to Settings > General > Accessibility > Increase Contrast, and then toggling the Reduce Transparency switch to ON.
 3. Background App RefreshThe ability to allow applications to fresh their own content in the background isn't new to iOS 9. It's a small feature that is extremely beneficial to app developers who can provide their applications with the ability to go and fetch new content even when the application isn't active on the display. However, that level of functionality can be detrimental to the performance and battery life of the installed device.Device owners can choose to enable or disable Background App Refresh by heading to Settings > General > Background App Refresh. When activated, there's also a great level of granularity offered that allows permissions to be granted on a per app basis.
 4. Siri Suggestions Siri has become ever more intelligent and capable as part of the iOS 9 refresh. That also means that Siri has become more power hungry and requires additional system resources as part of the assistant's deeper integration into iOS. Siri Suggestions suggests apps, people, locations, and a lot more when you search. This is even offered up before you start typing. This feature can be great for modern devices, but can cause issues for certain hardware. To disable Siri Suggestions navigate to Settings > General > Spotlight Search, and toggle the Siri Suggestions switch OFF. If you wish to leave it on, iOS provides the ability to remove apps from the search results.
  5. Clean Installation of iOS 9 Using iTunesRestoring a device is generally considered one of the last resorts when it comes to attempting to resolve performance issues that are being experienced after a new version of iOS has been installed. However, it's been found in the past that updating to the latest version of iOS via Apple's OTA update mechanism can sometimes cause issues. Connecting the device to iTunes and restoring it will provide a fresh installation of Apple's latest mobile operating system. Make sure to create a full backup of your data prior to doing this as everything will be wiped.6. Restore iPhone, iPad or iPod as New
This is not ideal but the last resort. If you’ve setup your iOS devices by restoring from backup then the battery life problems could be due to some issue with the backup. Try to restore your idevices (Settings -> General -> Reset -> Erase All Content And Settings) and set it up as a new iPhone (not from the backup). But before you erase all the contents and settings, take a backup of your Apple devices using iTunes or iCloud, or selectively take a backup of your photos and videos using Dropbox or Google+.Tips: Updating to new OS is never out of rick, and a large number of people suffered data loss during iOS 9 update, say, update fails, device goes to recovery mode, or data deletion for more update space. Check out: iOS 9 Update Stuck At 'Slide to Upgrade' | Recover iPhone Videos | Recover iPhone Voice Memo | Recover iPhone RemindersLuckily, if you rely on some software tools, such as the iOS Data Recovery- Wondershare Dr.Fone for iOS, there would be a big difference. It could come to offer a safe and quick way to rescue the contacts, messages, photos, etc. on your iPhone 6s plus/6s, iPhone 6 plus, iPhone 6, iPhone 5S, iPhone 5C, iPhone 5, iPhone 4S, iPhone 4, iPhone 3GS, iPad, iPod in many circumstances. It supports the latest Windows 10, iTunes 12.2.1, iOS 9 too. Meanwhile, it offers you three kinds of recovery mode to recover data from iPhone, iPad and iPod touch: to recover data directly from the iOS device and to retrieve previous data by extracting it from iTunes and iCloud backup! Why not read the tutorials below to get a rough idea of iOS Data Recovery software, you will receive unexpected result.Download iOS Data Recovery Software: Buy iOS Data Recovery Software for Win/Mac now: Related Software:Wondershare TunesGo: Frees your music anywhere from iOS devices, doing what iTunes can’t.Wondershare Dr.Fone for Android: A quick way to recover your lost or deleted data from Android .Wondershare MobileTrans: One-click phone transfer tool to let you transfer data between Android, iOS, and Symbian devices. iFastime Video Converter Ultimate: Make all your Blu-ray, DVD collections and movie library compatible with iPhone, iPad, iPod.Have more questions about how to fix iOS 9 Lag And Slow Performance On iPhone/iPad/iPod, please feel free to contact us>> or leave a message at Facebook.More Topics:
As a fancier of Apple's iPhone devices, you may have confusion about where to find iPhone backup. Normally, each time when you sync iPhone with iTunes, iTunes will automatically generate a backup, or you can automatically backup your iPhone at anytime by right-clicking the iPhone in iTunes under Devices and choosing Back Up. Here we list top 5 questions you ask about the location of iPhone backup files. Check them out and find answers. 1. Where is the iPhone Backup File Location on Mac and in Windows?By default, iTunes will place the backup files to the following path. Check it out.iTunes backup location on Windows XP: \Documents and Settings\(username)\Application Data\Apple Computer\MobileSync\Backup\iTunes backup location on Windows Vista/Windows 7/8/10: \Users\(username)\AppData\Roaming\Apple Computer\MobileSync\Backup\iTunes backup location on Mac (Yosemite/Mavericks): ~/Library/Application Support/MobileSync/Backup/
 Note 1: The Application Data/AppData is a hidden folder in Windows. So you must turn on “Show hidden files and folders” option in Windows to see that folder.Note 2: The “~” represents your home directory of Mac OS. If you don’t see Library in your Home folder, hold Option and click the Go menu.2. How to Delete iTunes Backup & Change iTunes Backup Location?Option 1: Delete iTunes Backup1. Open iTunes Preferences. For Windows users, choose Edit > Preferences; for Mac users, choose iTunes > Preferences.2. Click Devices and select the backup your want to remove. Then click Delete Backup to delete the selected backup.
 Option 2: Change iTunes Backup LocationApple does not provide a direct way of changing location where the contents of iDevices are backed up. Here we’ll share quick ways for Windows/Mac users to easily move their backup for iTunes to another disk.
For Windows Users:1. Ensure that iTunes is closed and navigate to the folder where your iPhone backups are.2. Move the backup folder from C: Drive to the new desired destination via a simple drag and drop.3. From the Start Menu, type cmd.exe. Open the Command Prompt, right-click it and choose Run as Administrator.4. From the Command Prompt, type mklink /J “%APPDATA%\Apple Computer\MobileSync\Backup” “the new location of the backup folder”.5. Press Enter and wait for Windows to create a symbolic link to the new folder from the old one. For Mac Users:1. Make sure that iTunes isn’t running. Move your iTunes backup folder ~/Library/Application Support/MobileSync/Backup/ to the location of your choice.2. Launch Terminal Applications/Utilities/Terminal on your operating system.3. Once launched, type the following command line: ln -s /Volumes/DriveName/Backup/ ~/Library/Application Support/MobileSync/Backup (the DriveName would be the name of the new backup location).
 Question 3. What is Stored in iPhone BackupiTunes will backup camera roll (images), safari bookmarks, mail accounts, call history, network settings, voice memos, Auto fill information for webpages, messages, app settings, keyboard shortcuts, game center account, In-app purchases and wallpapers. So its really important to backup your iPhone data using iTunes.Note: Any videos greater than 2GB are not backed up.Question 4. What are the files named in iPhone Backup File Location?The filenames of iPhone in iTunes are encoded, here are what they are:
 Question 5. How to Find and View Files from iPhone Backup?Want to restore your iPhone, but unfortunately find the backup file have been deleted by mistake? Don’t worry. You can use an iPhone Data Recovery to recover deleted files from iPhone 6S/6S Plus/6/6 Plus/6S/6S Plus directly.Wondershare Dr.Fone for iOS is an iPhone backup extractor to help you quickly and easily find your iPhone backup data. It can automatically detect, find and list all your iPhone backup files without opening iTunes or connecting your iPhone to computer. And you don't need to take the trouble to remember the backup locations. Such a convenience! Now download and install it on your Windows PC. Mac users go to Wondershare Dr.Fone for iOS (Mac) and you will know how to find to iPhone backup files on MacBook Pro, iMac, MacBook Air, Mac Pro.Free Download iPhone Data Recovery Software: Learn how to Recover iPhone Data without iTunes backup here.With all the questions clear, you can better handle what you want to deal with iPhone backup file. Users have several reasons to find location of iPhone backup; but it is advisable to trust iTunes to take care of all your iPhone backup. This knowledge of finding location of your iPhone backup comes to your help when you want to Jailbreak your device.Related Software:Wondershare TunesGo: Frees your music anywhere from iPhone, doing what iTunes can’t.Wondershare Dr.Fone for Android: A quick way to recover your lost or deleted data from Android .Wondershare MobileTrans: One-click phone transfer tool to let you transfer data between Android, iOS, and Symbian devices. iFastime Video Converter Ultimate: Make all your Blu-ray, DVD collections and movie library compatible with iPhone.Buy iPhone Data Recovery Software for Win/Mac now: Have more questions about how to view iPhone Backup Files on PC/Mac, please feel free to contact us>> or leave a message at Facebook.More Topics: